|
The height of this bench is 38 in., a comfortable working
height for most people. If you prefer a lower work surface, you can
lower the bench. However, be aware that alterations also affect the
dimensions of the table saw module (
Fig.
B
) and the depth of the under-bench drawers (
Fig.
C
), the flip-up assembly table (
Fig.
D
), and the slide-out drawer panel (
Fig.
E
).
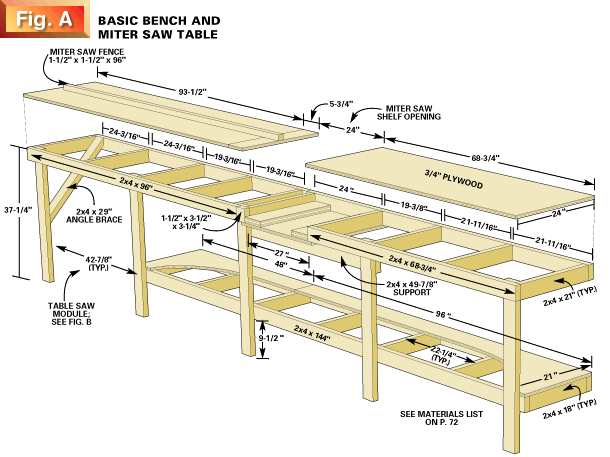
The workbench/miter saw table, made entirely from 2x4s and
3/4-in. plywood, is the basic framework for all the other features.
An alcove allows the miter saw to be set below the bench top, making
the miter saw table even with the bench (Fig. A).
That
way, the bench serves as a support table when you're cutting long
stock. To help hold long material square to the saw fence, screw a
2x2 to the bench for an extended fence (
Photo
5
). Miter saw tables vary greatly in height depending on the
brand. Customize the alcove to get the right height. In our design,
a piece of plywood screwed to the underside of the bench creates a
4-1/4 in. deep recess. Measure the height of your miter saw table to
determine how much to shim up the base of the saw to make it even
with the table. If your miter saw table is higher than 4-1/4 in.,
you'll have to shim between the underside of the bench and the
plywood base. Make the miter saw removable for those on-the-road
jobs by installing T-nuts and wing screws.
|

|

| |
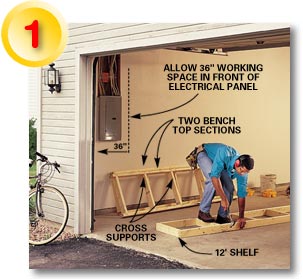
PRECUT the cross supports and rails using the
dimensions given in Fig. A, p. 63. Nail the cross supports to
the rails for the two bench sections and the shelf section
with two 16d nails at each
joint.
|
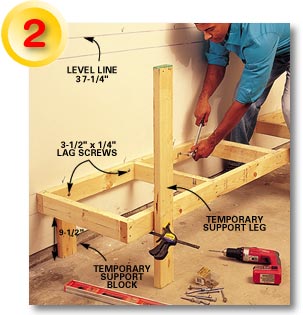
When
installing the bench framework, don't assume your garage floor is
level. Most likely it's sloped toward the garage door. Draw a level
reference line on the wall (Photo 2) to keep the shelf and
bench level.
|
|

| |
SNAP two level lines at 37-1/4 in. (bench frame
height) and 12 in. (shelf frame height) from the floor the
length of the bench. (Note: Garage floors often slope toward
the door, but the ceiling or top framing is level.) Begin your
layout on the wall on the end of the bench that's farthest
from the door. Rest the shelf framing sections on the
temporary support blocks, and clamp temporary 4-ft. legs to
the front of the framing, holding the shelf level. Bolt the
rear 2x4 to every wall stud with a 3-1/2 in. x 1/4-in. lag
screw.
|

|
|

| |
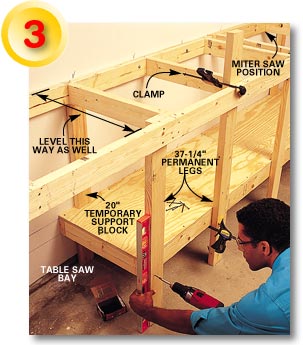
SCREW 3/4-in. plywood to the framing of the
lower shelf with 1-5/8 in. screws. Tack two 20-in. long
temporary support blocks to the wall on top of the shelf
plywood. Rest the bench frame on the supports, level it and
clamp the front rail to the temporary support legs. Plumb the
permanent legs and screw them into the front of the shelf rail
and into the backside of the bench rail with four 3-in.
screws. Add the 2x4 angle brace shown in Fig. A. Screw
the plywood to the bench top, leaving the miter saw bay
open.
|

|


